Since I have made a Facebook page to link my web store and blog I was stunned and somewhat overwhelmed by the amount of people that have reached out to me with questions, comments and just overall communication. I’m thrilled you all are so interested in my blog and work, for that I am making March Q&A month, even though I already have posts lined up feel free to keep the questions coming. Some questions may seem a bit silly but I welcome almost all questions, just not any which may be harassment/offensive to some. Keep it clean.
Today’s Q&A
Do you do any sacrifices on animals or anything? –E.B.
Wiccans and Pagans do not sacrifice animals or any of living being, I can not sit here and tell you all people practicing the craft do/don't but I can tell you its not the way of wiccans and pagan "Harm None". Though I do get annoyed when some people say there is no sacrificing within the craft. The only religion I know of that does is Santeria, but don't get the wrong idea. Where there is a sacrificial ceremony it is not to worship the devil or demons, some religions and cultures believe it is an offering to there gods.
-The Crafty Witch
Showing posts with label craft. Show all posts
Showing posts with label craft. Show all posts
Thursday, March 27, 2014

Wednesday, March 12, 2014
Animals As Equals
Since I have made a Facebook page to link my web store and blog I was stunned and somewhat overwhelmed by the amount of people that have reached out to me with questions, comments and just overall communication. I’m thrilled you all are so interested in my blog and work, for that I am making March Q&A month, even though I already have posts lined up feel free to keep the questions coming. Some questions may seem a bit silly but I welcome almost all questions, just not any which may be harassment/offensive to some. Keep it clean.
Today’s Q&A
Do you treat animals as equals? –S.C.
Absolutely. Every aspect of the craft is that you respect nature and all nature has to offer. Nature is you and me, animals, plants, the stars, etc. These are living things and they have a spirit. Many rituals deal with harmony and the healing of nature. Animals are our equals and for those who believe in reincarnation and spirit animals, those aspects play a huge roll in those views.
-The Crafty Witch
Today’s Q&A
Do you treat animals as equals? –S.C.
Absolutely. Every aspect of the craft is that you respect nature and all nature has to offer. Nature is you and me, animals, plants, the stars, etc. These are living things and they have a spirit. Many rituals deal with harmony and the healing of nature. Animals are our equals and for those who believe in reincarnation and spirit animals, those aspects play a huge roll in those views.
-The Crafty Witch
Monday, March 10, 2014
New To The Craft
Since I have made a Facebook page to link my web store and blog I was stunned and somewhat overwhelmed by the amount of people that have reached out to me with questions, comments and just overall communication. I’m thrilled you all are so interested in my blog and work, for that I am making March Q&A month, even though I already have posts lined up feel free to keep the questions coming. Some questions may seem a bit silly but I welcome almost all questions, just not any which may be harassment/offensive to some. Keep it clean.
Today’s Q&A
What should someone new to the craft do? -Robert
Do a little research first and find others that share your passion, read books on Wicca and other pagan religions and see what fits you best. You will find that is a lot of traditional aspects, but don’t let someone tell you there is a certain way you must don’t things. There is no “right” way to be a witch. Create your own path, follow your on journey.
-The Crafty Witch
Today’s Q&A
What should someone new to the craft do? -Robert
Do a little research first and find others that share your passion, read books on Wicca and other pagan religions and see what fits you best. You will find that is a lot of traditional aspects, but don’t let someone tell you there is a certain way you must don’t things. There is no “right” way to be a witch. Create your own path, follow your on journey.
-The Crafty Witch
Monday, October 21, 2013
DIY Black Bat Wall Decor
This is not an official DIY Dollar store project, but it is still so cute and very much affordable All items on the Black Bat Wall Decor can be found at your local Dollar Tree.
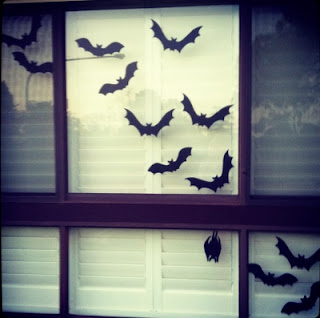


Best of this
entire project will only cost $3.00!
What you’ll
Need:
- Scissors
- Tape
- Construction Paper
- Template
*All items
italicized are item you probably already have around your own home.
*All items
underlined are optional
Easy
Step-by-Step Directions:
1. Print out the template and cut out the bat shape
2. Trace the Bat Shape onto the Black Construction paper
3. Cut out the bat from the construction paper
4. Tape To the Wall


---------------------------------------------
-The Crafty
Witch
Monday, September 30, 2013
DIY Spooky Tree Centerpiece
The Tree
Centerpiece really pulls together a room, whether it be spooky for child’s fun,
it will definitely have everyone looking twice
Best of this
entire project will only cost $3.00!

What you'll Need:
• Black
Plastic Cauldron
•
Floral/Craft Foam
• Glass Gems,
Rocks, or Stones
• Halloween
Tinsel Garland
• Plastic
Skeleton Garland
• Twigs from
Your Yard
• Paint &
Paint Brush (Optional)
• Glittery
Bat Ornaments (See Directions on Page 2)
*All items
italicized are item you probably already have around your own home.
*All items
underlined are optional
Easy
Step-by-Step Directions:
1. First,
gather a few spooky-looking twigs from your yard.
2. Place the
floral/craft foam in the center of the cauldron and
fill the
empty space around the foam with glass gems, rocks,
or stones.
This will anchor your foam and provide stability
for your
tree.
3. Stick the
twigs from your yard securely into the foam... make
sure you push
them far into the foam for stability. Arrange
twigs into
your desired tree shape. If you want to paint your
twigs black
or another color, do that next. They will be easier
to paint
standing upright in the foam. Set the tree aside to dry.
4. Once the
twigs are dry, cover the stones at the base of the
tree with
Halloween tinsel garland, then place the skeleton
garland on
top of the tinsel and position the skeletons
however you
wish.
5. Decorate
the tree with more skeletons, Halloween creepy
creatures, or
handmade glittery bat ornaments (see directions
on page 2).


I did mine a
little differently but both ways are acceptable. I had bits of gravel from
around by house that I was able to anchor mine down with but there are many
options available at your local Dollar Tree to find what you would like best.
Also I did not line the bottom of my tree centerpiece with tinsel garland and
the skeleton garland, I was going for a spookier look to I surrounded mine with
Spanish Moss (available at the Dollar Tree)
---------------------------------------------
Here is also
link for those of you how would like to have a print out of the directions - it
will take you to the Dollar Tree site where you can print out a PDF!
-The Crafty
Witch
Monday, September 23, 2013
DIY Monday - Glitter Bats
These Glitter Bats are so fun to make and they are so
adorable, if you are making these with your kids I do want to tell you it can
get a bit messy (with the glue and glitter) but otherwise it is a fun project
for you and your young ones!


Best of all this project will only cost $5.00!
What You'll Need:
• Foam Craft Balls
• Plastic Sandwich Bags
• Craft Glue
• Paint Brush
• Glitter in Various Colors
• Black Plastic Plates
• Scissors
• Googly Eyes
• Thread or Fishing Wire
• Crafting U-Pins
*All items italicized are item you probably already have
around your own home.
*All items underlined are optional
Easy Step-by-Step Directions:
1. Put glitter colors into separate plastic sandwich bags.
2. Using a paint brush, cover a foam craft ball with craft glue
and drop it into a bag of glitter. Shake the ball around
until it’s
covered with glitter, then remove it from the bag and set
aside
to dry. Repeat these steps with each foam craft ball.
3. Using the patterns to the right as stencils, trace the
wing shapes
onto black plastic plates and cut them out.
4. When the glittery foam balls are dry, stick a bat wing
into each
side, pressing firmly to make sure they’re secure in the
foam.
5. Glue two googly eyes onto each bat.
6. Using thread or fishing wire, tie a loop for hanging and
attach it to the foam bat ornament using craft U-pins.
7. Hang them on your spooky tree or around the house and
enjoy!


---------------------------------------------
I did mine a little differently but both ways are
acceptable. I painted all my bats black and then just sprinkled some of the
colored glitter on top of them while they were at the point where they were
still not quite dry. (I found for our purpose of DIY Under $5 that it just wasn't possible for the amount of glitter that was given. To follow the Dollar
Tree steps I would recommend maybe buying 2 or 3 bottle of glitter depending on
how may bats you want to make) then I followed the directions up until step
three, I used black construction paper I had around my house for the bat wings.
To apply I folded the edge of the paper and glued that to the bat.
---------------------------------------------
Here is also link for those of you how would like to have a
print out of the directions - it will take you to the Dollar Tree site where
you can print out a PDF!
-The Crafty Witch
Subscribe to:
Posts (Atom)